In this tutorial, we will look at installing YOLO v8 on Mac M1, how to write the code from scratch, and how to run it on a video. We will also see how to manage the graphics card for the best possible performance. We will use YOLO v8 from ultralyticsc for object detection.
Installation Of YOLO V8 On Mac M1
To be able to use the YOLO v8 on Mac M1 object detection algorithm we have to download and install Yolo v8 first. Open Mac’s terminal and write
pip install ultralytics
if the installation gives no errors you are ready for the next step

Let’s Start With OpenCV
We can start writing code on our Mac M1. We decided to apply object detection with Yolo v8 on a video so let’s start with processing the video. With OpenCV the video is processed as a sequence of images, so we import the video and prepare the loop
import cv2
cap = cv2.VideoCapture(“dogs.mp4”)
while True:
ret, frame = cap.read()
if not ret:
break
cv2.imshow(“Img”, frame)
key = cv2.waitKey(1)
if key == 27:
break
cap.release()
cv2.destroyAllWindows()
This is the result of the first test, the video starts regularly so you can proceed to the next step.

Import YOLO V8 And The Object Detection Model
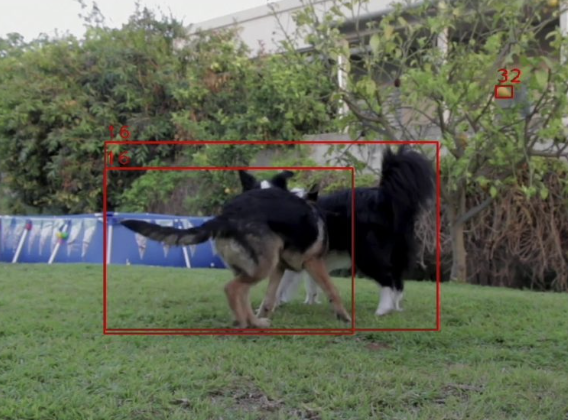
We import Yolo v8 from ultralytics with the template yolov8m.pt and thus obtain the coordinates of the bounding box related to the two dogs in the video.
from ultralytics import YOLO
import numpy as np
cap = cv2.VideoCapture(“dogs.mp4”)
model = YOLO(“yolov8m.pt”)
…
results = model(frame)
result = results[0]
bboxes = result.boxes.xyxy
print(boxes)
…
Running the code will extract the coordinates from the first frame so we can immediately assess how it is progressing and if there are any errors

As you can see the extracted coordinates are tensor and cannot be used inside Opencv with this format so we import the numpy library and proceed with the conversion.
bboxes = np.array(result.boxes.xyxy.cpu(), dtype=”int”)
classes = np.array(result.boxes.cls.cpu(), dtype=”int”)
Let’s transfer this information to the image
for cls, bbox in zip(classes, bboxes):
(x, y, x2, y2) = bbox
cv2.rectangle(frame, (x, y), (x2, y2), (0, 0, 225), 2)
cv2.putText(frame, str(cls), (x, y – 5), cv2.FONT_HERSHEY_PLAIN, 2, (0, 0, 225), 2)
And this is the result. You can see the bounding box on both dogs and in the upper left corner the number 16. This number corresponds to the position of the class (dog) in the list of 80 classes in the pre-train model with coco dataset

Speed Tests
Now we come to the most interesting point of this tutorial, the test of YOLO v8 on Mac M1 with CPU and graphics card usage and comparison with Nvidia graphics card on windows.
1. YOLO V8 On Mac M1 On CPU
Using the basic setting and applying no changes to speed it up 482.2 ms per frame, does not seem to be an outstanding result

2. YOLO V8 On Mac M1 On Graphic Card
To use these functions we need to verify that mps backend on pytorch is enabled.
import torch
print(torch.backends.mps.is.available())
In my case it’s active and here are the test results

If you also display True then insert this line on the code and you will take full advantage of the speed of your Mac M1 with Yolo v8
results = model(frame, device=”mps”)
Running the code you can see that the video is processed virtually in real-time. Checking also the reference speed we also see a marked improvement, in fact in this case it goes to 42.2 ms per frame

3. YOLO V8 On Nvidia RTX 3060
Let’s do the test on Windows on an Nvidia RTX 3060 Graphics Card. We use the same code but we only need to change this line
results = model(frame, device=”0″)
As you can see in the image below the test resulted in about 18 ms per frame. It should be pointed out that the code could still be optimized for this GPU because its utilization is at 50%

ที่มา: https://pysource.com/2023/03/28/object-detection-with-yolo-v8-on-mac-m1/

